CENTURY 21 Affiliated Announces Strategic Partnership with CMG Financial and Welcomes Greg Harkleroad as Joint Venture Division Sales Manager

Madison, WI – June 26, 2025 – CENTURY 21 Affiliated is proud to announce a new strategic partnership with CMG Financial, a top five privately held mortgage lender in the U.S., and the appointment of Greg Harkleroad (NMLS ID# 427611) as the Joint Venture Division Sales Manager to lead this exciting collaboration.
This partnership represents our continued commitment to delivering a seamless and exceptional home-buying experience for our clients across the Midwest and West Coast. With CMG’s innovative lending platform and long-standing reputation for excellence, combined with CENTURY 21 Affiliated’s position as a leading real estate franchise, we are poised to provide unmatched service and support to our buyers and agents.
“We are thrilled to announce our relationship with CMG Financial,” said Dan Kruse, CEO of CENTURY 21 Affiliated. “After extensively researching mortgage partners, we found CMG to be best-in-class when it comes to technology, customer experience, and agent support. By aligning with a lender of their caliber, we are confident this partnership will significantly elevate the home-buying journey for our clients.”
At the helm of this new joint venture is Greg Harkleroad, who brings nearly 40 years of mortgage experience and a proven track record of leadership, team building, and business growth. His passion for helping individuals achieve homeownership and his commitment to Realtor collaboration make him the ideal leader for this initiative.
“Greg brings decades of mortgage expertise to the venture,” said Sam Bell, President of Brokerage, CENTURY 21 Affiliated. “He has built numerous winning teams and is dedicated to supporting our agents and buyers at every step of the home financing process. We are excited to have him onboard.”
Greg’s approach to leadership centers around strategic hiring, coaching, and fostering strong relationships with real estate professionals to ensure a purchase-focused, service-driven mortgage experience.
“A strong Realtor-lender partnership is the foundation for delivering exceptional service,” said Harkleroad. “I’m excited to collaborate with CENTURY 21 Affiliated to bring that vision to life.”
With this partnership, CENTURY 21 Affiliated continues to prioritize innovation, support, and growth across its markets in Wisconsin, Michigan, and Southern California, offering agents and clients access to an experienced lending team, in-house technology, and personalized mortgage solutions.
For more information, please contact Greg Harkleroad at gregh@cmgfi.com or (513) 617-4407.
About CMG Financial
CMG Financial is a well-capitalized mortgage lender founded in 1993 by Christopher M. George, a former Mortgage Bankers Association Chairman. CMG makes its products and services available to the market through three distinct origination channels: retail lending, wholesale lending, and correspondent lending. CMG also operates eight joint venture companies with builder & realtor partners, holds an impressive MSR/servicing portfolio, and serves the capital markets of fixed income trading & sales through CMG Securities. CMG currently operates in all states, including District of Columbia, and holds approvals with FNMA, FHLMC, and GNMA. The company is consistently recognized as a top-producing lender and top mortgage employer, and it prides itself on helping clients achieve the dream of homeownership through product innovation and streamlined servicing.
About CENTURY 21 Affiliated Real Estate LLC
CENTURY 21 Affiliated is a member of multiple listings services in California, Illinois, Michigan, Minnesota, and Wisconsin with over 1,400 sales professionals and 60+ offices. CENTURY 21 Affiliated also specializes in worldwide relocation. At CENTURY 21 Affiliated, the customer comes first. The complete commitment to this philosophy is what has made CENTURY 21 Affiliated such a powerful force in the real estate industry. CENTURY 21 Affiliated has been ranked the number one CENTURY 21® franchise in the world for eleven years in a row. Visit C21Affiliated.com to learn more.
###
America’s Richest Self-Made Woman, Billionaire Diane Hendricks, and Daughter Konya Hendricks Schuh Take on Hometown Revitalization in New Daytime Docuseries

“BETTING ON BELOIT”
New Home Renovation and Design Series Premieres July 12 at 1 pm ET/PT on A&E, Part of the Network’s Lifestyle Daytime Programming Block
Trailer HERE
NOTE: Konya Hendricks Schuh and Connor Fox are licensed real estate agents with CENTURY 21 Affiliated.
LOS ANGELES – (June 11, 2025) – America’s richest self-made woman, Diane Hendricks (#1 on the Forbes “Richest Self-Made Women” list the last eight consecutive years) is betting big on the town integral to her family’s success. The series chronicles the billionaire entrepreneur and her driven, accomplished daughter Konya Hendricks Schuh’s mission to revitalize Beloit, Wisconsin – once ranked as the state’s “worst city to live in” by USA Today.
Premiering Saturday, July 12, with back-to-back episodes at 1pm and 1:30pm ET/PT on A&E, Betting on Beloit airs as part of the network’s lifestyle daytime programming block. Episodes will also be available the next day on A&E’s website and on-demand.
Rising from humble beginnings to owning the largest wholesale construction supplier in the nation, Diane settled in the area in the 1970s and became a titan of industry – and one of Beloit’s biggest employers – helping build up the region as an industrial epicenter where thousands flocked to achieve the American dream. While Diane’s headquarters remained local, the 1990s saw too many industrial employers move overseas, forcing many residents of Beloit to find opportunity elsewhere. Determined to restore Beloit to its former glory, Diane has spent the last several decades working to improve the city through major economic development efforts. In addition to building a new stadium and school, hotels and multiple restaurants, Diane revitalized the entire industrial riverfront, finding new uses for the once-abandoned factory buildings.
Now, Diane has tasked Konya, a sharp real estate broker with a passion for design and a deep connection to the city, with leading the next phase of the revitalization effort.
Betting on Beloit follows Konya and her dynamic team – which includes her husband Matt (a plumbing contractor and former home builder), good friend and project manager Pete, and her realtor nephew Connor, as well as local artisans and designer friends Kristin and Mitch – as they purchase, restore and reimagine historic homes throughout Beloit’s storied neighborhoods.
With her mother financing this ambitious venture, the stakes are high for Konya and her team as they try to achieve their collective mission: to turn once-neglected properties into vibrant dream homes for individuals and families ready to plant new roots in Beloit. With grit, heart and a whole lot of Midwest spirit, they’re not just flipping houses—they’re rebuilding their community, one home at a time.
Tune in to all 12 episodes to get an inside look at the vision, challenges and triumphs of a bold revitalization journey that proves the American dream is still alive – and rooted in places you might not expect.
Betting on Beloit is produced by Wheelhouse’s Butternut, with Courtney White, Konya Hendricks Schuh, Rachel Sobel, Russ Friedman, Will Nothacker, Frank Carlisi and Tim Grady serving as executive producers.
About A&E
A&E leads the cultural conversation through high-quality, original programming that captivates viewers and brings them to the heart of the stories that matter. Through its distinctive brand of award-winning non-fiction and documentary programming, A&E always makes entertainment an art. For more press information and photography, please visit press.aegm.com. A&E is a division of A+E Global Media (aegm.com), a joint venture of the Disney-ABC Television Group and Hearst Corporation.
About Butternut
Lifestyle production company Butternut is run by lauded producer and executive Courtney White, formerly president of Food Network and general manager of HGTV. A joint venture with Wheelhouse launched in 2022, Butternut creates original food, home and other lifestyle content for all platforms, working with a range of established, emerging and home-grown talent. The company’s current slate includes Next Baking Master: Paris (Food Network); Giada In My Kitchen (Prime Video); Cookie, Cupcake, Cake (Hulu/A&E); Last Bite Hotel (Food Network); Divided by Design (HGTV) and Celebrity Family Food Battle(Roku), executive produced and starring Sofia Vergara, plus other series on deck for launch later this year.
About Konya Hendricks Schuh
With more than two decades of experience in real estate development, sales and construction, Konya Hendricks Schuh brings a deep understanding of the industry and a long-standing commitment to community revitalization. The daughter of Diane Hendricks – co-founder of ABC Supply and one of America’s most influential business leaders – Konya has long been immersed in the business of building, transforming and investing in communities. Sharing in her parents’ devotion to Beloit, Konya has played a key role in numerous projects that have contributed to the city’s ongoing growth and renewal.
As a real estate broker, she specializes in residential and new construction properties, helping clients navigate the market with a designer’s eye and a developer’s mindset. For each project, Konya runs point on all decisions, big and small, and leads the design process with a focus on honoring each home’s history and style while elevating spaces with modern touches.
Konya serves as the secretary and treasurer of the Hendricks Family Foundation, where she helps guide philanthropic initiatives focused on education, workforce development and economic opportunity. She is also the new chairman of the board for Grey Collar Enterprises, which is the parent company of Hendricks Commercial Properties and Geronimo Hospitality Group. In addition to her professional achievements, Konya is a proud mother, wife and devoted advocate for animal welfare.
About CENTURY 21 Affiliated Real Estate LLC
CENTURY 21 Affiliated is a member of multiple listings services in California, Illinois, Michigan, Minnesota, and Wisconsin with over 1,400 sales professionals and 60+ offices. CENTURY 21 Affiliated also specializes in worldwide relocation. At CENTURY 21 Affiliated, the customer comes first. The complete commitment to this philosophy is what has made CENTURY 21 Affiliated such a powerful force in the real estate industry. CENTURY 21 Affiliated has been ranked the number one CENTURY 21® franchise in the world for eleven years in a row. Visit C21Affiliated.com to learn more.
###
Foreclosures Rose in Q1 2025 – Is It a Warning Sign?

With everyday costs seemingly rising across the board, the state of the housing market is a natural concern. When basic living expenses rise, even critical financial responsibilities like mortgage payments start to slip, leading to increased foreclosures. Unsurprisingly, new data shows filings for foreclosures rose in Q1 2025, stirring worries about another housing crash like in 2008.
But as it turns out, there’s less cause for worry than you might think. When contextualized correctly, it’s clear these new number don’t point to a repeat of the last big housing crash.
The 2008 Market Versus 2025
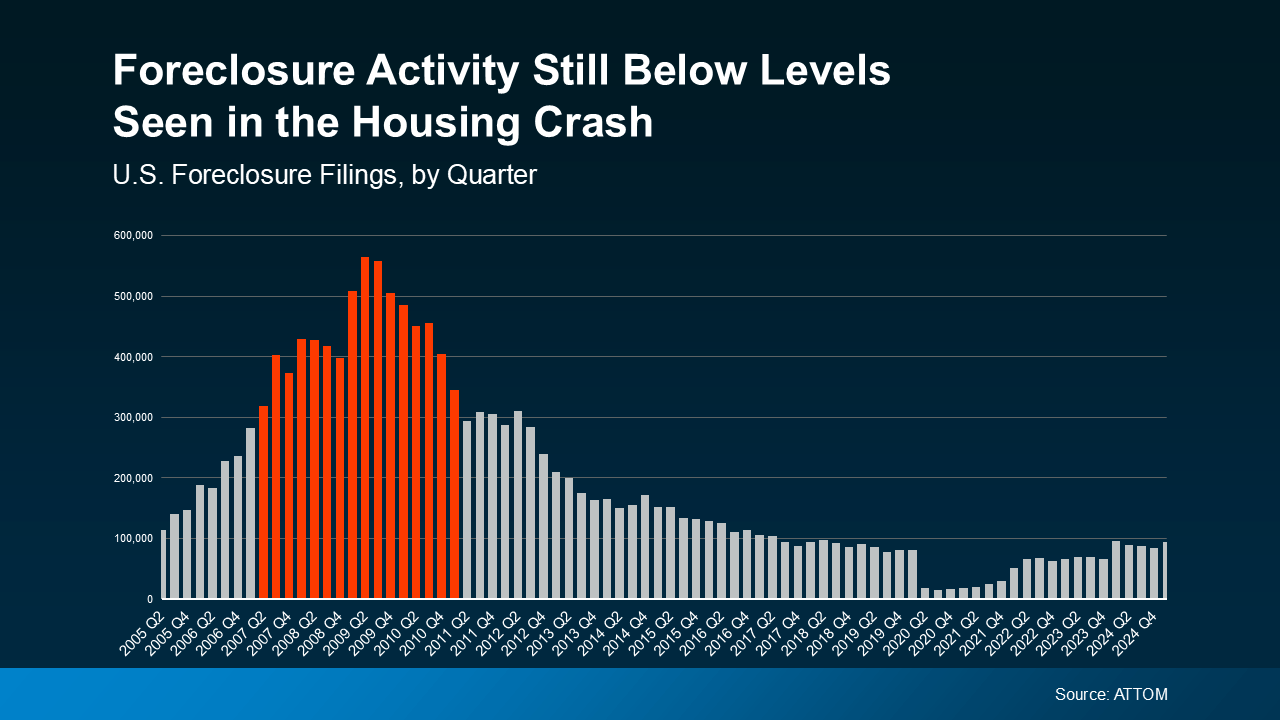
The latest quarterly report from ATTOM shows that foreclosures did rise in Q1 2025, which is concerning at first glance. However, foreclosure filings were still lower than the normal historical average, and far below the levels seen in 2008. When plotted visually, it’s easy to see the huge difference between 2008 and 2025.
Compare the foreclosure filings in Q1 2025 to the years surrounding the 2008 crash on the graph below. Even in the years preceding and following the 2008 crash, foreclosures were dramatically higher than what we’re seeing now.
Back in 2008, lenders were approving loans using much riskier practices, saddling many homeowners with mortgages they couldn’t afford. This flooded the market with distressed properties, surplus housing inventory, and free-falling home prices that collectively caused the crash.
In the years that followed, lending standards became much stricter and stronger to prevent such a crash from happening again. Today, most homeowners are in a much better financial position, and foreclosures have stabilized as a result.
The graph may appear to show foreclosures ramping up since the lows of 2020 and 2021, but this is deceiving. Foreclosures during those years were unusually low thanks to a moratorium designed to help millions of homeowners through the pandemic. That moratorium has since ended, which has caused foreclosure filings to return to the more normal levels we see now.
Compared to pre-pandemic years like 2017-2019, foreclosures overall are actually relatively down from what’s considered normal. So while foreclosures rose in Q1 2025, this doesn’t point to a troubling surge in the market.
Why Foreclosures Haven’t Surged in 2025
Another reassuring difference in today’s real estate market is the power of increased homeowner equity. As home prices have exploded over these past few years, homeowners have enjoyed a welcome boost to their wealth. According to Rob Barber, CEO at ATTOM:
“While levels remain below historical averages, the quarterly growth suggests that some homeowners may be starting to feel the pressure of ongoing economic challenges. However, strong home equity positions in many markets continue to help buffer against a more significant spike . . .”
In short, if a homeowner can’t make their mortgage payments, they may be able to sell their home to avoid foreclosure. During 2008, many people owed more than their homes were worth and had no choice but to foreclose. Today, most homeowners have much stronger equity that protects them from being forced into foreclosing. As Rick Sharga, Founder and CEO of CJ Patrick Company, recently explained in a Forbes article:
“ . . . a significant factor contributing to today’s comparatively low levels of foreclosure activity is that homeowners—including those in foreclosure—possess an unprecedented amount of home equity.”
Conclusion
It’s true that foreclosures rose in Q1 2025, but they’re nowhere near the levels seen during the 2008 crash. Even as home prices continue rising, strong equity is protecting existing homeowners and bolstering their wealth. This doesn’t discount the struggles some homeowners are facing, but it’s a reassuring fact for the market at large.
If you’re a homeowner facing foreclosure, ask your mortgage provider about what options are available to you. Are you a first time buyer eager to build your equity? Contact us today for the info you need to get started.
Here’s the Next Best Time To Sell Your Home This Spring

Back in March, Realtor.com reported that the best time to list your house in 2025 was April 13–19. With that week now behind us, you may be wondering if you missed your chance this year. Fortunately, you still have plenty of time, if another source’s prediction holds true this spring.
Realtor.com may be one of the biggest property search sites, but others have their own data, studies, and methodologies. This means that they sometimes receive different results and reach different conclusions. This means that they sometimes receive different results and reach different conclusions, which may be good news for you. Because according to Zillow, the ideal spring house selling window hasn’t passed yet.
Reports on the Best Spring Selling Period
New research from Zillow has found that sellers who list their homes in late May tend to see higher sale prices. Based on home sales from 2024, homes listed in May had the highest sale premium of about $5,600. According to Zillow‘s study:
“Search activity typically peaks before Memorial Day, as shoppers get serious about house hunting before their summer vacation and the new school year in the fall. By targeting late spring, sellers can get their home listed when the most shoppers are looking. When more buyers are competing for homes, sellers can command a higher price.”
But Zillow isn’t the only one declaring May as the best time for home sellers to list. Using data from 59 million home sales over the past 13 years, ATTOM Data completed a similar study. In this case, it was found that sellers who list in May net an 11.1% higher closing price on average.
“Freshly compiled sales statistics from ATTOM demonstrate that home sellers continue to reap significant benefits from listing their properties during the month of May. Examination of home sales trends spanning thirteen years reveals that, on average, sellers are commanding 11.1 percent premium above the estimated market value.”
Meanwhile, a report from Bankrate states that listing at any time in April or May is ideal. In fact, it found that homes listed in May on average sell for about 13.1% above market value:
“Some patterns and trends usually do hold true throughout the year, and one is that spring continues to be the best time to sell. Sellers can net thousands of dollars more if they sell during the peak months of April and May. . .”
If these reports are accurate, then there’s still time to list during peak home selling season. Closing your home sale in May could get you a sizable increase in your final sale price.
Of course, the best week to list your house ultimately depends on your own local real estate market. Prices are driven by buyer demand and home supply, and these can vary wildly from market to market. This is why working with an experienced local agent can be so helpful, especially in uncertain markets.
Conclusion
Even though Realtor.com‘s recommended spring selling window has passed, other sources say there’s still plenty of time this year. Spring is always a busy time in real estate, and you can take advantage without listing during a specific week.
The true best time to sell your house will be determined by your own unique local market this spring. Working with an agent can help remove some of the guesswork, and get you the best closing price possible.
Many Fear a Housing Market Crash in 2025 – Will It Happen?

Between every economic uncertainty underpinning this year so far, Americans are understandably trepid about the future. Amid market lows and rising prices, many are asking if we’re heading for a housing market crash in 2025.
If talk of tariffs and mercurial markets are giving you pause about your plans, you’re not alone. In fact, new data from Clever Real Estate has found that 70% of Americans are worried about a housing crash in 2025. But how likely is this, and what does the latest data say?
Low Inventory Prevents a Crash in Prices
Before you put your plans to buy or a sell a home on hold, let’s look at the facts. The reality is that the trends in the housing market we’re seeing aren’t signs of crashing, only of shifting. As Chief Economist at First American Mark Fleming explains:
“There’s just generally not enough supply. There are more people than housing inventory. It’s Econ 101.”
Consider the basic laws of supply and demand. If the supply of something is low, its prices are bound to go up, and homes are no exception. And even though housing inventory is up in 2025, high demand from buyers is still driving home prices higher.
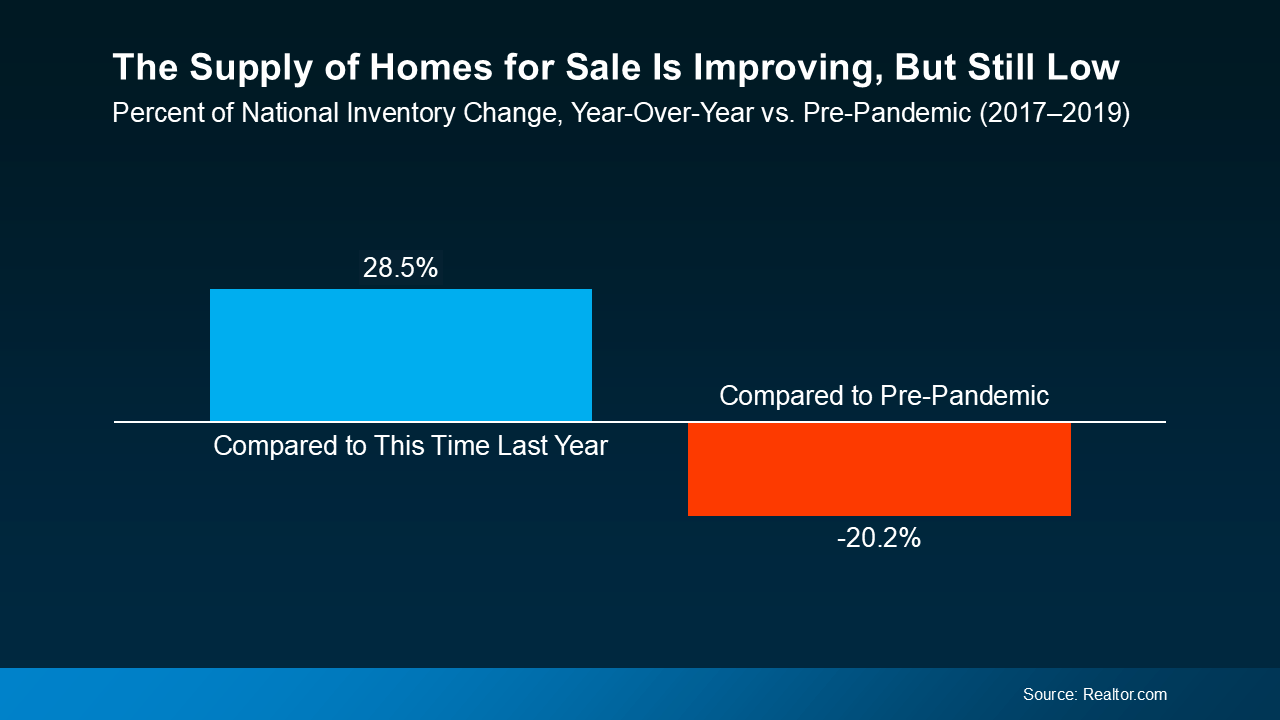
According to recent data from Realtor.com, the number of homes for sale in 2025 is climbing, but still below normal levels. Even still, home supply is at its highest since pre-pandemic levels, showing a positive trend in the right direction.

That ongoing low supply is what’s stopping home prices from dropping at the national level. As Lawrence Yun, Chief Economist at the National Association of Realtors (NAR), says:
“… if there’s a shortage, prices simply cannot crash.”
Home Prices Normalize as Inventory Increases
As more homes are listed on the market, upward pressure on home price growth normalizes. Prices may not be falling, but they’re rising at a rate closer to what we’d consider normal for the market.
Even though prices aren’t declining nationally, increased inventory means they’re rising more slowly than they were. The trend we’re currently seeing is what’s considered price moderation.
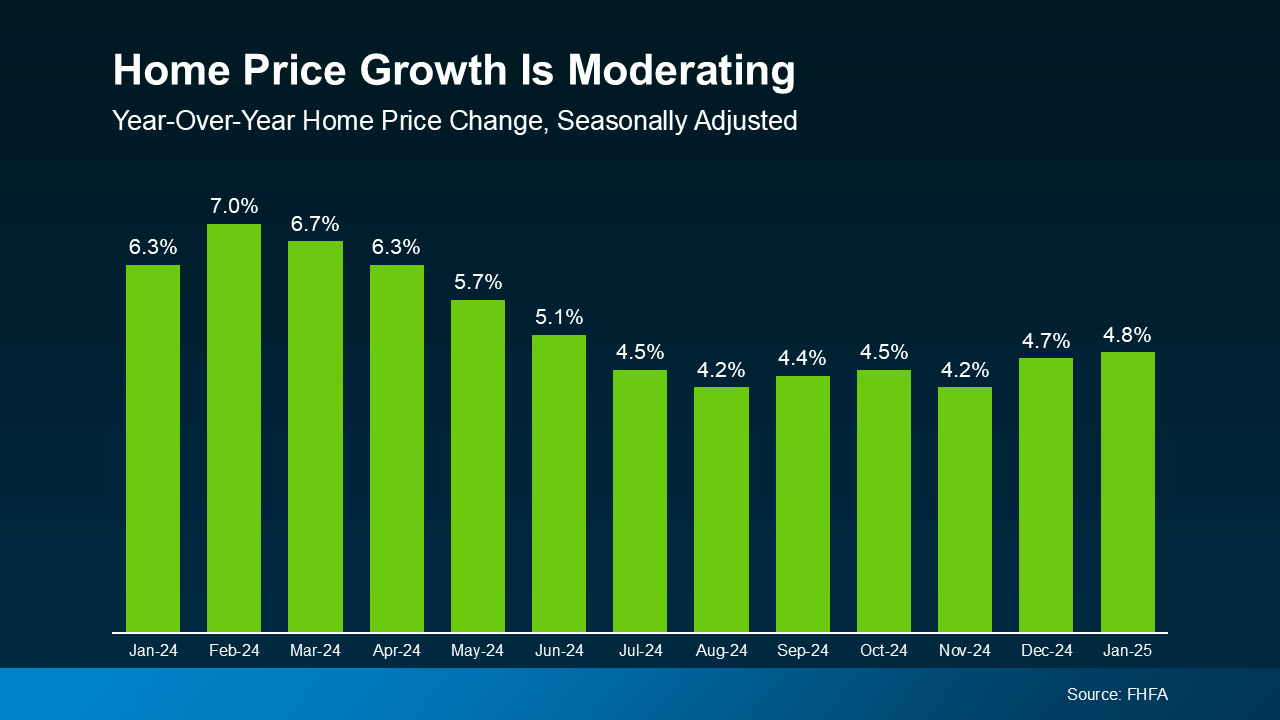
The good news for buyers is that this price moderation is expected to continue throughout the rest of the year, according to a January report from Freddie Mac:
“In 2025, we expect the pace of house price appreciation to moderate from the levels seen in 2024, while still maintaining a positive trajectory.”
This means that home prices will continue rising in most markets, but not as quickly as they did in 2024. This is great news for anyone who’s been priced out of the market thanks to rapid price appreciation these past few years.
These numbers represent national trends, so the true story will vary in individual markets. A local real estate agent can give you the latest details on the market trends in your your own unique area.
Conclusion
Fears of a housing market crash in 2025 abound, but don’t let this worry you. While a little caution is healthy, experts are confident that a housing market crash is unlikely in 2025. As a recent report from Business Insider says:
“. . . economists who study housing market conditions generally do not expect a crash in 2025 or beyond unless the economic outlook changes.”
In reality, this year’s housing market is stabilizing thanks to decreasing price growth and increasing home supply. If you’re curious about the market trends in your local area, contact us today to connect with an agent who can reassure you with the facts.
CENTURY 21 Affiliated Named Among Top 100 Real Estate Firms in RISMedia’s 2025 Power Broker Report

CENTURY 21 Affiliated, the #1 Century 21 franchise in the world, proudly announces its ranking in RISMedia’s 2025 Power Broker Report, which recognizes the nation’s top-performing real estate firms based on transactions.
CENTURY 21 Affiliated has been ranked #40 based on transactions, and #57 based on sales volume, reinforcing its standing as a dominant force in the real estate industry.
Published annually, RISMedia’s Power Broker Report is based on responses to its Power Broker Survey, distributed each January. The report celebrates the remarkable achievements of real estate leaders and brokerage firms that continue to drive the industry forward.
See Dan Kruse’s Feature in the 2025 Power Broker Report Here.
“Our real estate professionals consistently deliver exceptional service in an evolving market,” said Dan Kruse, CEO & Owner of CENTURY 21 Affiliated. “We’re honored to be recognized among the top brokerages in the country, a testament to our agents’ dedication and commitment to excellence.”
With 1,400 sales associates and 70+ offices spanning California, Illinois, Michigan, Minnesota, and Wisconsin, CENTURY 21 Affiliated remains a leading full-service real estate brokerage. Since joining the CENTURY 21® system in 1978, the company has upheld a legacy of innovation and customer-focused service.
View the Full 2025 Power Broker Report Here.
About CENTURY 21 Affiliated Real Estate LLC
CENTURY 21 Affiliated is a member of multiple listings services in California, Illinois, Michigan, Minnesota, and Wisconsin with over 1,400 sales professionals and 70+ offices.
CENTURY 21 Affiliated also specializes in worldwide relocation. At CENTURY 21 Affiliated, the customer comes first. The complete commitment to this philosophy is what has made CENTURY 21 Affiliated such a powerful force in the real estate industry. CENTURY 21 Affiliated has been ranked the number one CENTURY 21® franchise in the world for eleven years in a row. Visit C21Affiliated.com to learn more.
©2025 CENTURY 21 All Rights Reserved. CENTURY 21® and the CENTURY 21 Logo are registered service marks owned by Century 21 Real Estate LLC. Each office is independently owned and operated.
###


 Facebook
 X
X
 Pinterest
 Copy Link

